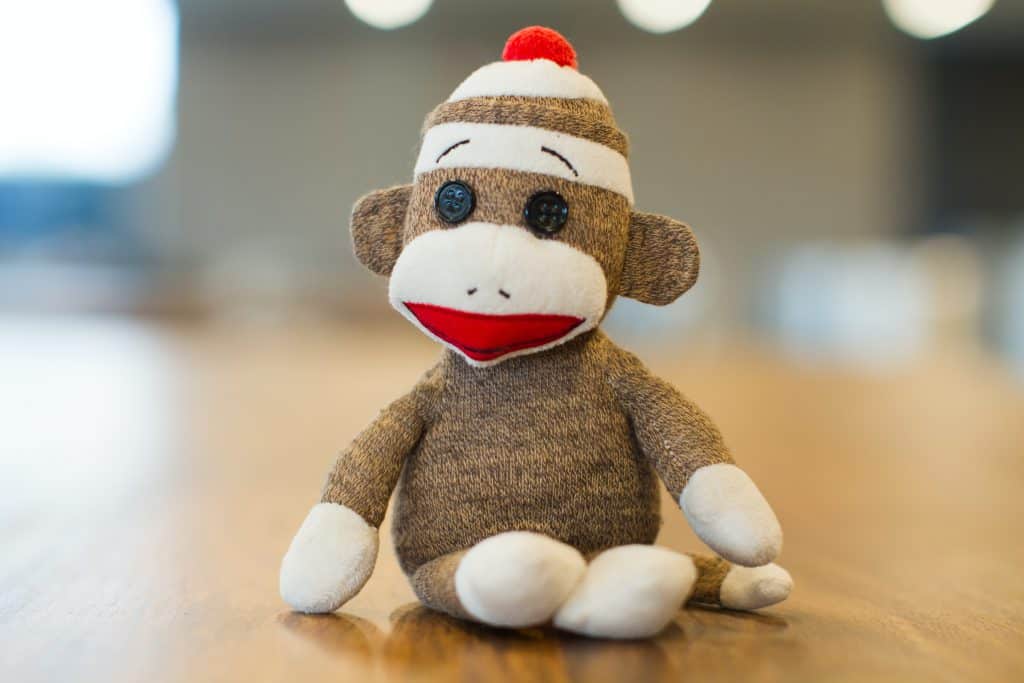
Working on a fun sewing project with your little ones can be a wonderful way to spend some quality time together. Children love learning new things and expressing their creative side, and sewing can be a combination of both. If you and your kids have never been on such an adventure, making a sock monkey might be a great choice. This is a timeless, easy, inexpensive, and super-cute project practically all children enjoy. Read on to learn how to sew a sock monkey and when you can let your kid take charge of the process.
Step #1: Gather Your Supplies
As the name suggests, sock monkeys are made out of socks. This means you’ll need to get your hands on a nice pair of thick socks. If you want to sew up a classic sock monkey, be sure to buy socks with red heels because one of the red heels will serve as the monkey’s mouth. The size of the socks doesn’t matter much, but if your kid wants a big sock toy, opt for a large pair. You’ll also need some stuffing to fill up the sock monkey, buttons of any size (you can use kid-safe snaps or tiny pieces of felt for the monkey’s eyes if you fear that your child might swallow the buttons), some embroidery floss for the monkey’s face, sewing thread, scissors, pins, needles, a fabric marker, a sewing gauge, and accessories to customize the toy. The last bit is, of course, optional.
As you can see, you won’t need your sewing machine for this project because working around the sock monkey’s body using such a large piece of equipment can get really tricky. Plus, sewing by hand gives you the chance to teach your kid the basics of this amazing life skill without overwhelming them with details about the machine.
Step #2: Turn the Socks Inside Out and Lay Them Flat
To be able to transform the socks into a sock monkey, you need to turn them inside out and lay them flat so the heel lies in the center of the sock (faces up). One of the socks will form the monkey’s main body (torso, legs, and head), while the other one will help you make the monkey’s arms, ears, and tail. Regardless of the sock style you’ve chosen, make sure your socks are clean and in good condition (holes are a big no).
Step #3: Split One Sock Into Legs
Before you cut one of the socks you’re working with, you need to draw a line. Grab your sewing gauge and your fabric marker and draw a guideline starting from the center of the sock’s opening and ending 1-1½ inches from the heel. So, for example, if the opening is 4 inches, you need to start the line at the 2-inch mark. Once you draw the line, you need to grab a pair of sharp scissors and cut through both layers of fabric. If your child knows how to use a sewing gauge or a regular ruler, let them do the drawing.
Step #4: Sew Along the Inner Legs
It’s now time to thread your hand-sewing needle and start sewing. First, sew along the bottom of each leg and then sew up the sock monkey’s inner legs. Feel free to use any stitch type you like. When you sew the inner legs, be sure not to go all the way up but stop when you are an inch away from the end. If you forget this bit, you won’t be able to turn the sock-monkey-to-be right side out and fill it with stuffing.
Step #5: Turn the Sock Right Side Out and Fill It
Flip the sock right side out through the gap you left in the previous step. Then, grab your stuffing and start putting it inside the toy (including its legs!) through the opening. Don’t stop until the monkey is fully stuffed and you reach the desired firmness. When it comes to stuffing, you can purchase quality polyester fill like Fairfield’s Poly-Fil or improvise with small strips of fabric and/or cotton balls. Your sock monkey might end up with a few lumps here and there if you opt for the latter, though.
Step #6: Close the Opening Between the Legs
Now that the monkey is fully stuffed, you need to sew the opening closed with your needle and thread so the polyfill can’t come out. Regardless of the type of stitch you’ll choose for this part of the project (the whip stitch is ideal for beginners, while slip stitches are a great option for experienced sewers), it’s smart to sew the gap twice to further increase security. To make things easier, pin the opening closed before you start stitching and remove the pins one by one as you sew.
Tip: Keep the stitches and the distance between them small for added security.
Step #7: Create the Monkey’s Head
First, determine the size of the head by wrapping your thumb and your index finger around the top of the monkey’s body. This can be around 4 inches down from the top. Then, grab a rubber band and twist it around where the monkey’s neck is supposed to be. Tying a beautiful ribbon around the rubber band is a great way to hide the rubber band and make the toy more interesting. Once you’re done with this step, put aside the monkey’s body and grab the other sock. Make sure it, too, is inside out.
Step #8: Cut Out Arms, Ears, and Tail From the Second Sock
Cut three long strips for the arms and the tail, two small curved pieces for the ears, and use the heel of the sock to form the monkey’s mouth. Feel free to draw these forms to make the cutting easier and be sure to cut through both layers of fabric.
Step #9: Sew the Arms
You first need to fold both of the arm pieces in half lengthwise. Make sure the wrong side of the sock is visible. Then, get your thread and needle and sew across one of the short ends and then along the long open side. Do this with the other arm strip as well. Any type of stitch will do the trick here.
Step #10: Sew the Tail
To make the tail of your sock monkey, follow the instructions for the arms (step 9). Don’t forget to sew up just one end. You’ll need an opening to fill the tail with stuffing.
Step #11: Sew the Ears
First, fold the ear pieces in half and align the curved sides. Once you’re done, proceed to sewing them up from one end of the curve to the other. The ears of the sock monkey don’t have to be filled with stuffing, so feel free to stitch them closed.
Step #12: Stuff the Arms and Tail
It’s now time to flip the arms and tail right side out and fill them with the stuffing of your choice. If you’re having a hard time pushing the stuffing into these pieces, grab a pen and use it to push the polyester fill down. Sewing the arms and tail of the sock monkey isn’t necessary as you’ll stitch them onto the body (the first sock), thus shutting them.
Step #13: Sew the Arms and Tail to the Body
Start by pinning the arms and tail onto the parts of the monkey’s body where they should be (the arms onto the sides and the tail on the back). Then, sew the end of each piece to the monkey applying tight and close stitches. For optimal security, do the stitching twice.
Step #14: Fill the Mouth Piece With Stuffing and Sew It to the Face
Place some stuffing on the wrong side of the mouth piece you cut in step 8. Then, put it on the lower half of the monkey’s head and stitch its edges to the head. The stuffing, of course, should be hidden. If you want to make the toy more appealing, consider sewing a smile across the mouth piece and two dots or Xs for a nose with some embroidery floss.
Step #15: Sew the Ears to the Head
First, pin the ears in place with the straight side of each ear touching the monkey’s head. After that, check to see whether the ears are symmetrical, adjust them if they’re not, grab your needle and thread, and stitch the straight sides onto the head. Repeat the stitching at least once to keep the ears from falling.
Step #16: Attach the Buttons
Give the monkey a pair of eyes by sewing two buttons above the mouth. Begin by sewing from underneath the button through one of the holes and then insert the needle through the opposite opening. Do this several times and end the process by passing the thread through two diagonal holes. It’s the same drill for the other eye.
Step #17: Customize
This is when you can let your kid’s imagination run wild. You can make cute clothes out of felt and glue them to the monkey’s body, cut out the first letter of the monkey’s name from a piece of fabric and sew it on the chest, jazz the toy up with a pom pom hat, or come up with a more interesting idea. Don’t overthink, just do!
Final Words
This project might seem too long or complex for a young child, but it’s totally worth it. Your kid will learn how to measure, cut, and make simple stitches while having heaps of fun. Just make sure to guide and supervise them every step of the way.
Last update on 2025-07-09 / Affiliate links / Images from Amazon Product Advertising API