Some of us have been there, and others have at least imagined it and justifiably dreaded the possibility: you eat so much at your neighbor’s BBQ that you want to loosen your belt, but you are embarrassed, or even worse, you have no belt you can loosen. Then you consider loosening the button that holds your pants together, but doing that at your neighbor’s crowded table is even more embarrassing, and oh, what is that, another round of wonderfully spiced grilled steak, well surely not, but no, it certainly is, oh what the hell, one more bite wouldn’t hurt, or would it, and POP! off goes your button…
You want the ground to open and swallow you, but not only that… You also want a subterranean tailor to be there to sew your button back onto your pants so you can get back to the BBQ party and wink at the person you have a crush on as if temporal disappearance of you and your buttons is part of your constitution, which suits you since you are clearly missing a button, but, honestly, even the prospect of being Thom Yorke is somehow better at that moment.
What if I tell you, though, that you shouldn’t foster such anxiety anymore because at the end of this post, you’ll know how to sew a button back onto your pants, so that you can lose any number of buttons you like?
How to Sew a Button Back onto Pants: A Step-by-Step Guide
Step 1: Buy Buttons
I don’t know whether you keep spare buttons stashed somewhere in your house ,or if you still keep the replacement buttons that are sometimes included when you buy a pair of pants, but if you don’t already have them, I recommend you get some high-quality buttons first.
Don’t think like: “Oh, my buttons are all intact. I don’t need that.” Even though you are very careful about your diet, accidents still might happen and the buttons might eventually come undone due to wear-and-tear. Being prepared always pays dividends.
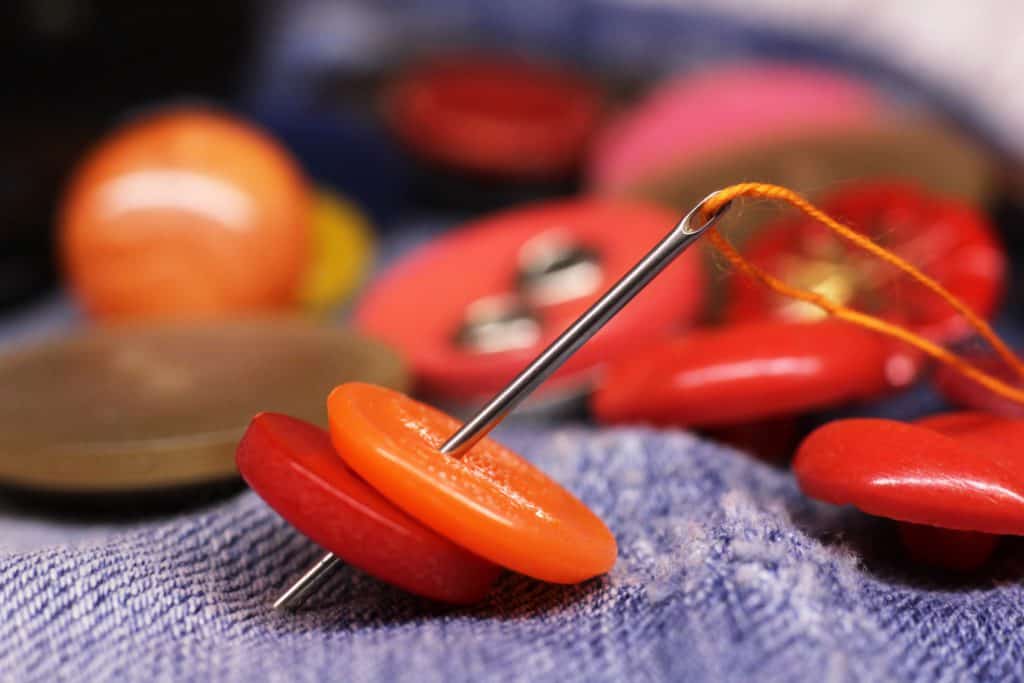
For hand-sewing, I only recommend buttons with four holes on them. Four holes are essential for a durable end-product.
Step 2: Prepare Your Sewing Tools
You probably already know what equipment you’re going to need for sewing a button on pants. A fitting button, a needle, and an ample length of thread are all you need. Put the thread through the eye of the needle and tie enough knots on the end of the thread to secure it.
People will tell you picking a thread of matching color is of crucial importance, but nothing’s stopping you from going colorful, and if somebody is going to judge your taste or decisions on such a trivial matter, shame on them.
Step 3: Place the Button
It might sound like a straightforward step, but placing the button is never only placing the button on where it should be when it comes to sewing, but also threading the needle through one of its holes preferably from behind the fabric. Pull the thread all the way through, and take one last look to make sure that the button is on its right side.
Step 4: Start Sewing an X Shaped Pattern
Remember, there should be four holes in your button, and the target is to create an X shape on it by sewing diagonally. While doing that, make sure that you are not leaving the thread loose by pulling it all the way through. By doing that, you will add to the durability of your new button.
Step 5: Create Space Between the Button and Fabric
You might be worried now that you might need another tool for this step, but it’s also achieved by your needle and thread.
During your last pass through the buttonholes towards the fabric, stop when the needle is in between the button and fabric and wrap the thread around the sewn part between the button and fabric a couple of times.
If you don’t do it, there might be a problem while you are getting buttoned up because there won’t be any space for the button to slide in easily.
Step 6: Tie a Knot at the Back of the Fabric
Remember I stopped you in the middle of your movement from through the buttonholes and to the back of the fabric? After creating a space between the button and fabric, you should continue that move and get to the end of the fabric. This time, though, you are going to tie a solid knot at the back of it and cut off any loose thread.
After that? Well, there is no after that because, congratulations, you are done!
Step 7 (Optional): Eat Everything to Test the Strength of the Button You Just Sewed
Personally, I would never do this, but it’s up to you!
Best Buttons for Any Type of Pants
The button on your favorite jeans popped off and you don’t think the spare buttons you have are suitable for them? Your corduroy pants are in need of a button, but you only have metal replacements that are more suitable for rider jeans, which would give your corduroy an unnecessarily badass look?
Well, don’t worry. I’ll tell you what type of button to get for which kind of pants, so you can purchase them with just a click and have no headache or hesitation later on.
Best Button for Trousers and Corduroy Pants: Faux Buffalo Horn Buttons by Renashed
Trousers and corduroy pants have one thing in common: an unostentatious dignity. Therefore, it’s only understandable that you don’t want to affix a shiny metal button initially designed for jeans. Whatever you are going to sew on them shouldn’t stand out – instead, it should just blend into the background fabric.
This 90-piece button box by Renashed provides perfect cover for that. It features buttons in 5 different colors: coffee brown, royal blue, beige, gray, and black, all of which are perfectly capable of blending with the color of your favorite trousers or corduroy.
Best Button for Chinos: Buffalo Coin Shank Buttons by Bezelry
Chinos are strange. From a fashion point of view, I could never get my head around them, but looking at all these buttons to provide better guidance for you, I had a revelation. They are, like, the exact definition of normcore: inconspicuous and chaste, yet there’s something in their dirtiness that signifies a brand of stylishness.
Therefore, I recommend these antique-looking coin-style buttons for chinos. They will be able to complement the ideology behind chinos with their dirty but stylistic look.
Best Button for Jeans: Vintage Metal Buttons by Greekywin
You want to join the local motorcycle gang, but you don’t have the buttons on your denim jackets and jeans that are classy enough for that particular dream? These vintage high-grade, extremely classy, gold buttons by Greekywin may yet rescue that dream of yours.
Be aware, though! Since these lapel buttons have only one hole on the back, sewing them onto pants in a solid manner is almost impossible. Therefore, you might need to buy as many replacements as you can.
Final Words
There are a couple of boring and basic sewing activities such as hemming pants or shirts by hand and sewing a hole and patching it. I would understand it if you were to think: “Oh, why should I learn all these as there are tailors whose job that literally is?”, but I wouldn’t necessarily agree with you because by learning the techniques of basic repairs for your clothes, you’ll be saving a lot of money and a lot of hassle.
Even if you have the means and energy to go to a tailor shop or replace whatever garment in need of repair immediately with a new one, there might come a time you’ll rue that you have never learned these – like a camping trip away from civilization, where a whole range of accidents are just waiting to happen to your or your kids’ pants and shirts. I believe that taking out your sewing kit right then and there and fixing the problem in fifteen minutes will make you a very cool parent – not that you already are not, of course.
Last update on 2025-07-18 / Affiliate links / Images from Amazon Product Advertising API


