If you’re looking for a fun sewing project that’s not too difficult and well fits many different occasions – look no further. The first thing that pops into my mind is a personalized oven mitt. You need it for your baking and cooking, but it’s also an excellent gift for your mom, dad, brother, sister, male and female friends alike.
A DIY oven mitt is not only practical (and a household can never have too many of these, as they wear and tear, wash, and you may need a few pairs at the same time if you are cooking together with someone) but also a beautiful and simple gift if you put some effort into picking the right pattern for the person you are gifting.
You can also mind the kitchen or an existing apron design and match the mitten to them so that you or your dear person are perfectly coordinated color and design-wise in the kitchen.
Making an oven mitten is a project for a confident beginner – you should know some sewing basics and have a few projects behind you to do this with ease. The project itself doesn’t take more than 1 hour to finish, and you can combine your sewing skills with other skills such as quilting.
What Do I Need to Make an Oven Mitt?
You mostly need just the essential sewing equipment to sew an oven mitt. Use this list of necessities to check whether your sewing gear is up to date, and in case you’re missing something, use the clickable links I added in the text for a quick purchase of some of the best products from the category.
Tools You Need for Making an Oven Mitt
- Sharp tailoring scissors;
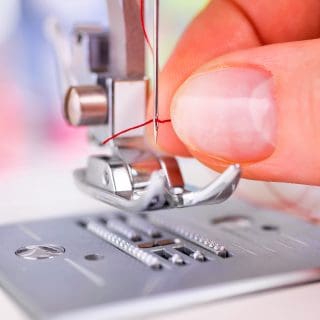
- A sewing machine;
- Walking foot;
- Fabric chalk, pen, or tailor pencil;
- Safety pins;
- Sewing pins;
- Color-matching thread;
- A regular pencil or fabric turner;
- Iron;
- Ironing board.
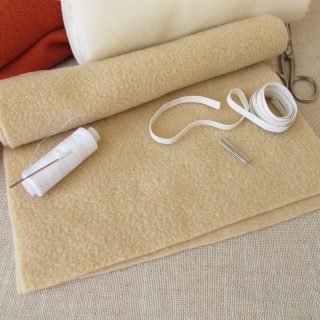
Materials You Need for Making an Oven Mitt
- Outer fabric. You can use cotton, canvas, polyester, or material for home decor. You need two pieces, each being 10” x 13”.
- Lining fabric. You need two pieces of the same size as the outer fabric.
- Insulated batting. Again, two pieces of the same size as the outer and lining fabric. I recommend Insul-Bright insulated batting combined with Warm and Natural Batting.
- Bias tape. It should be double-wide.
- Pattern for making an oven mitten. Here is one for free by iThinksew.com, but there are also many printables on Pinterest.
How to Make an Oven Mitt Step-by-Step Guide
Finally, let’s get that bread… with an oven mitten, of course.
Align your sewing gear somewhere at hand. Preparation is the most important part of every sewing project, even if we talk about simple ones such as this one.
Step 1: The Making of a Quilt Sandwich
For some reason, everything about this sewing project reminds me of food, so does the first step to sewing a good mitten.
If you plan to incorporate some simple quilting to your mitt (and I would highly recommend that), I suggest you do it before you even cut out the pattern. You can also do it after your mitten is complete, but this is the easiest way for me.
To make a quilt sandwich, you need to layer the fabric and batting together by first lining the fabric to go down the right side. Then, you need to place the insulated batting so that the shiny side is up. Align the insulated batting in this order:
- Warm and natural insulated batting;
- Insul-Bright insulated batting;
- Agan, Warm and natural insulated batting.
Finally, position the exterior piece of fabric right side up.
Use safety pins again to baste all of the layers together and ensure that your surfaces are flattened and with no wrinkles. To make the quilt sandwich for the other side of your mitten, simply repeat this process.
Step 2: Layer Quilting
Once your quilt sandwiches are done, use the sewing machine to sew them together. You can do this as you wish: simple, detailed, patterned, or not, whatever suits your needs and preferences. My personal favorite is to make a diagonal and then make parallel lines with a walking foot.
A pro tip for quilting is to start from the middle of the fabric and make sure that everything is flat and smooth. Once you’re done, don’t forget to take out the pins. You probably will run into them as you quilt; however, once you’re done, make sure to check once again whether all of the pins are out.
Step 3: Apply the Pattern
Finally, we are approaching the actual shape of the mitt. Take the fabric pieces you’ve just quilted and align them to stand together on the right sides. Then, take the mitt template you’ve chosen (and printed in full size) and place it over the fabric.
Take a sewing pen, chalk, or marker, and outline the shape of the pattern.
Once you’ve done that, take the two sides, align them together again with right sides facing each other, and secure them with pins.
Step 4: Sew the Quilt Sandwich
If you didn’t use the walking foot in the previous steps, now is a good time to attach it to the sewing machine, as you’ll definitely need it. When working with many layers or thick fabrics, you should use this extra help to create more traction so that your machine can more easily sew over the material (s).
Once the foot is attached, take the marked fabric and sew along the pattern line. Make sure to leave the bottom line open.
At the beginning and the end, use a backstitch, as it will hold the parts of the mitten securely together. Pass through this part as many times as you need until you’re sure you got it tight and right.
Step 5: Final Cuts of the Mitt
Are there any pins left in the mitten? If not, you can proceed to cut, but as in the previous steps, I would advise you to check for any leftover pins thoroughly, so you don’t hurt yourself later.
When cutting the mitten, leave around ¼ of an inch of seam allowance and also watch out not to damage the stitches, as if you do, you’ll have to go back to the sewing machine and repeat the quilt sandwich sewing process.
Step 6: Turn the Mitt Over and Apply Pressure
Use the opening you left on the bottom of the mitt to turn it over. Once again, do this gently, so you don’t damage the stitches. Help yourself with a fabric turner or a plain pencil.
Once your mitten is inside out, press it well with an iron.
Step 7: Make a Loop and Sew it Onto the Mitten.
A nice and simple detail you can add to your mitten is a loop so that you can leave it hanging anywhere.
To make this, you can use the bias tape, for example. You need to fold the tape in half and then attach the right sides together by clipping or pinning them to one of the seams you made on the mitten. You should make sure that the raw edges line up together. Once you got all that aligned, use the sewing machine to attach the loop.
Step 8: Binding the Mitt
While you still have the bias tape at hand, cut an approximately 17 inches long strip. Then, gently open the binding edge, its raw, long edge, and place the bias tape in such a way that it closes the mitten. If you have already attached the loop, start on the opposite side. If you didn’t make the loop, you could start on any side.
To secure your binding, place some pins or clips around the bottom of the mitten. Once you reach the part with the loop, enclose that one too into the binding.
After you’ve finished with the pinning, you’ll have some more binding to do, but we’ll get to that.
Step 9: Attaching the Binding
Some ¼ of an inch from the top side of the bias tape, make a stitch that will go all around. When you’re almost at the end, make some backstitches at the beginning.
You must sew properly around the bottom side of the mitten, and please watch out not to sew the bottom together (happens often, be careful). You will need to figure out the right angle for sewing it right by yourself, so take all the time you need.
You can stop sewing when you reach some 2 inches before the starting point (where you began to attach the binding). Carefully cut the remaining bias tape, leaving 1 full inch free. You need this piece to overlap with the starting point.
But before you close anything, open up the shorter edge of the tape (it’s where you made the last cut) and fold it into the binding.
The point of this is to have a professionally-done edge. If needed, you can now use a clip or a pin to keep the tape in place.
Step 10: Finishing Touches
The last step is to check whether all stitches are holding tightly and if anything is left loose. If yes, you should redo it with the machine to strengthen it, or by hand if you know how to.
Also, finish the sewing of your binding by covering its raw edge with the finished short edge. To make it as tight as possible, use a backstitch.
Final Word
While there are many steps to this sewing project, from material preparation to actual sewing of the pieces, it is not difficult to complete. For a lovely gift mitten, make sure to find a piece of fabric with a nice pattern design, and add some flare by actually attaching that loop
If you’re getting ready for a big family Christmas, you can at the same time exercise your sewing skills and prepare the perfect gift for the whole family: matching oven mittens!
There are so many ways to make use of a good oven mitten, and it’s an excellent opportunity for you to practice both quilting, hand sewing, machine sewing, and using sewing patterns.
Also, for me personally, it’s much more challenging to sew small-scale projects than bigger ones because they require so much precision and attention to detail. I would say that an oven mitten is also suitable for practicing this detail orientation.Thank you for using my tutorial to sew your oven mitt. I hope you’ve come to a satisfying result. For more instruction articles, visit the “How-to” section on my website, and discover how to make a throw blanket (another fantastic gift idea), how to make a hooded towel, how to make a beret hat, and much more.
Last update on 2024-04-23 / Affiliate links / Images from Amazon Product Advertising API